
⚙️ Settings panel
Every fine-grained behavior in VJam lives in the Settings ⚙ panel 🎛️ From how it hears sound, to how switches look, to the shape of the output — it's all on this one screen. Most "that's not what I expected" moments get fixed right here.
🔍 Where to open it
- The ⚙ button at the top of the Cockpit 👉 open the Cockpit with
Spaceon PC / a pinch 🤏 on mobile
Top-right: EN / JA switches the display language, × closes it. Whatever you change is saved automatically, so it's still there next time 💾
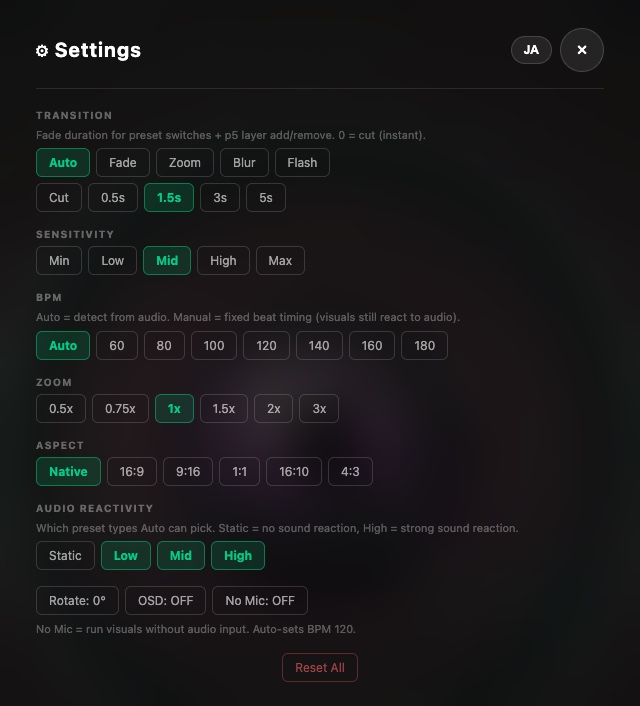
📋 Cheat sheet
The quick version first — each one is broken down below with "how do they differ?" and "when do I actually use it?" 👇
| Setting | What it does (options) | Default |
|---|---|---|
| Transition | How preset switches look, and how long (Auto/Fade/Zoom/Blur/Flash × Cut–5s) | Auto / 1.5s |
| Sensitivity | How strongly VJam reads the mic / audio (Min–Max) | Mid |
| BPM | Beat tempo (Auto = detect / 60–180 = fixed) | Auto |
| Zoom | Scales the whole visual (0.5x–3x) | 1x |
| Aspect | Output aspect ratio (Native/16:9/9:16/1:1/16:10/4:3) | Native |
| Audio Reactivity | Which preset types Auto can pick (Static/Low/Mid/High) | All but Static ON |
| Rotate | Rotates the visual 90° at a time (0°/90°/180°/270°) | 0° |
| OSD | Info overlay top-left (name/fps/BPM, etc.) ON/OFF | OFF |
| No Mic | Run visuals on demo audio, no microphone, ON/OFF | OFF |
| Reset All | Put everything back to defaults | — |
🎬 Transition — how switches look
Sets how visuals switch and layer in. Two rows: the style (how it changes) and the time (how long it takes).
Style (top row):
| Style | What you see | When to use |
|---|---|---|
| Auto | Picks Fade/Zoom/Blur/Flash at random each time | Keeps it from feeling repetitive (default) |
| Fade | Dissolves into the new visual | The most natural. When in doubt, this |
| Zoom | Pushes in from small to full | For energy / a sense of arrival |
| Blur | Starts blurry, eases into focus | Soft, gradual |
| Flash | The screen flashes for an instant on the change ⚡ | Snap changes on the beat. Great for EDM drops |
Time (bottom row): Cut (instant) – 5s.
- Cut 👉 instant switch. Fast tracks, sharp cuts
- 0.5–1.5s 👉 comfortably smooth (1.5s by default)
- 3–5s 👉 slow dissolve. Chill / ambient
Zoom / Blur / Flash are most visible when p5 visuals layer or switch. The time also applies to the fade on preset switches.
🎚️ Sensitivity — how hard it listens
How eagerly VJam turns incoming mic / audio into beats 👂 Five steps, Min–Max.
- Toward Min 👉 picks up only loud sounds. Calmer reactions. For cutting down false triggers in a noisy room
- Mid 👉 standard. Start here
- Toward Max 👉 picks up quieter sounds too. Twitchier. For getting more reaction in a quiet space
Turn it up if reactions feel weak, down if it over-reacts to room noise. This is the first knob to reach for 🎚️
🥁 BPM
Sets the beat tempo. Auto (detect from the sound) is fine most of the time. Pick a fixed BPM from 60–180 when you want the beat locked to a known tempo — the visuals still react to the sound, only the beat timing stays steady 🎯
- Auto 👉 detects tempo from the sound (can wobble)
- 60–180 👉 fixes the tempo. For a tight, steady rhythm, or when the audio is unstable
More in the 🔊 Audio input chapter.
🎛️ Audio Reactivity — which presets Auto picks
Filters which presets Auto (auto-switch) is allowed to choose, by how strongly they react to sound.
Every VJam preset is sorted into Static / Low / Mid / High by how much it reacts. Auto only picks presets from the types you leave ON.
- High 👉 loud, punchy, strongly sound-reactive presets
- Mid / Low 👉 moderate to subtle reactions
- Static 👉 barely moving / non-reactive presets (OFF by default, so Auto doesn't land on something that looks like a still image)
How to use it:
- If Auto keeps landing on subtle, barely-reactive presets 👉 also turn off Low, keep just High / Mid
- For all-out flashy 👉 leave only High ON
⚠️ This does not amplify the preset currently on screen. If a look barely reacts, raise Sensitivity first → if it still doesn't change, switch to another preset. The full Sensitivity-vs-Reactivity difference is in the 🔊 Audio input chapter, under "Sensitivity and Audio Reactivity".
📐 Zoom / Aspect / Rotate — output shape
Three controls for the size, ratio, and orientation of the output — handy when fitting a projector or a stream 📺
- Zoom (0.5x–3x) 👉 scales the whole visual. Higher makes detail bigger, but the edges get cropped. For showing detail larger
- Aspect 👉 output ratio. Anything but Native gets letterboxed centered at the chosen ratio (black bars fill the rest)
- Native = matches the current screen exactly (no letterboxing, default)
- 16:9 = landscape, monitors, TVs
- 9:16 = phone-vertical, Shorts, vertical signage
- 1:1 / 16:10 / 4:3 = whatever fits your setup
- Rotate (0°/90°/180°/270°) 👉 turns the visual 90° at a time. For matching the orientation of ceiling projection or a rotated projector
The hands-on side of external output is in the 📺 Projector chapter 📺
🩺 OSD (on-screen display)
Turn it ON to get a small info overlay top-left 👀 for a pre-show check or debugging. It shows:
- Preset name (
[2L]means two layers stacked) - fps (if it's dropping, it's heavy → switch to a lighter preset)
- BPM (check the beat is locked right)
- Blend / filter / Auto state
Leave it OFF normally. Flip it ON only when you're chasing "why is this heavy / why does the beat feel off" — the cause shows up on screen 🔍
🤖 No Mic (demo)
A mode that runs the visuals on built-in demo audio — no microphone. Turning it on fixes BPM at 120. It's the fallback for places where the mic can't pick anything up, or when you want to check motion in total silence. More in the 🔊 Audio input chapter.
♻️ Reset All
Puts every setting back to its default (with a confirm dialog). The escape hatch for "I tweaked too much and lost the plot" 🆘
🔗 Related
- 🔊 Audio input — the full Sensitivity vs Audio Reactivity difference
- 📺 Projector — Zoom / Aspect / Rotate in practice
- 📋 Reference — the full feature cheat sheet